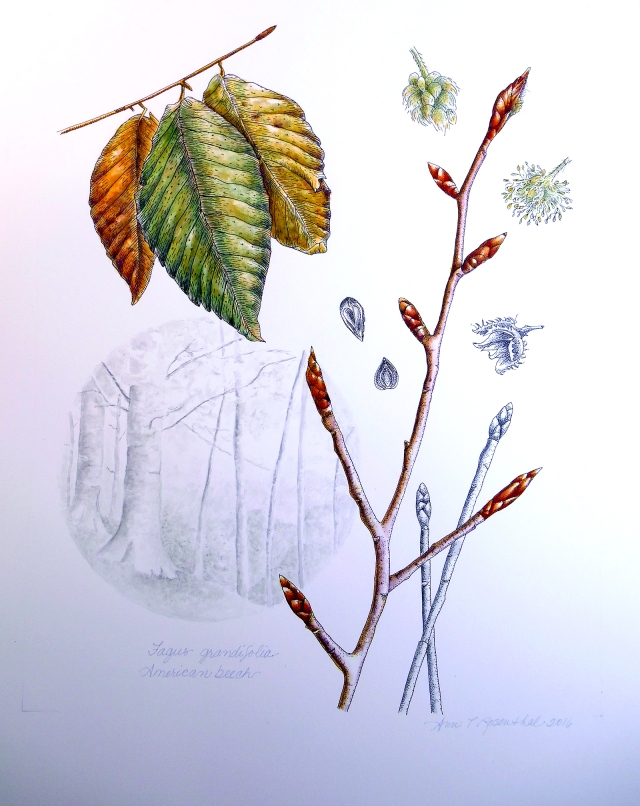
It’s been nearly a year since I posted “Slow Art” on Valentine’s Day. Last weekend I completed a botanical ‘portrait’ of Fagus grandifolia – American Beech. It was part of an annual project sponsored by Phipps Conservatory. Each year Phipps offers a botanical art/illustration workshop in which participants embark on a year-long study of a plant. Phipps selects the theme and provides a list from which to choose. Last year, the theme was native trees. We were required to include: leaf, flower, the leaf petiole and it’s attachment to the stem or branch, and either the seed, nut, or whole fruit. Their guidelines state: “This annual project brings together artists of varying styles for a single show. The variety makes the show eclectic and lends it energy. Among these varying styles, we hope to have some commonalities to tie the show together, and provide a strong educational impact.”
I chose the American Beech because it was the favored tree of the passenger pigeon and I had been making studies of it. Of course, I procrastinated in working on the project until December! Though I have been taking botanical art classes through Phipps for 4 or 5 years now, I have never made a complete “portrait” as this required.
My first challenge was the composition and figuring out what parts of the plant to include beyond the requirements. That was no easy task given the many possibilities. I looked at numerous botanical examples for ideas and was surprised at the range of approaches. Here’s a few of the American Beech:

Notice the differences! On the left is one branch with a landscape in the background. In the center is a close-up with limited elements and more detail (I am not sure if this one has been cropped or if it is how the artist intended, but I love the composition). I also like the more scientific “specimen” approach of the one on the right. So there are elements of all of these I wanted to include in my piece. Here is what I ended up with after several adjustments:

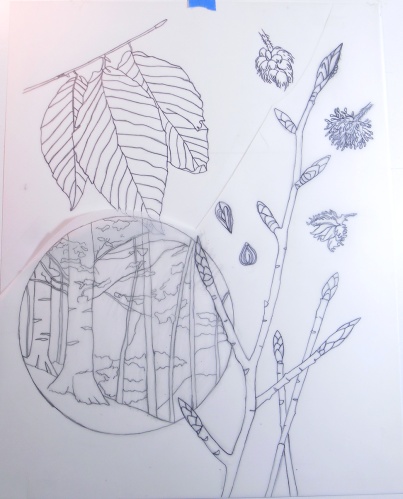
You can see that I combined two drawings for the final composition. Both were drawn on heavy tracing paper. Botanical artists never start directly with drawing on good paper, which can be expensive! You figure out your drawing first on tracing paper and then transfer it.
I also had to decide what medium to use: colored pencil, pen & ink, or watercolor, which are the preferred media for botanical art. I recently took a workshop with Deborah Kopka through Phipps that was mixed media, and which I very much enjoyed. This is not mixed media as we know it in the art world and which I use quite often–combining paint, collage, drawing, etc. Deb mainly combined pen with watercolor, then added pastel pencil to finish it off. I’ve always loved the look of pen, with the strong sense of the drawing and line work, and I am a painter at heart, so I chose pen and ink with watercolor.
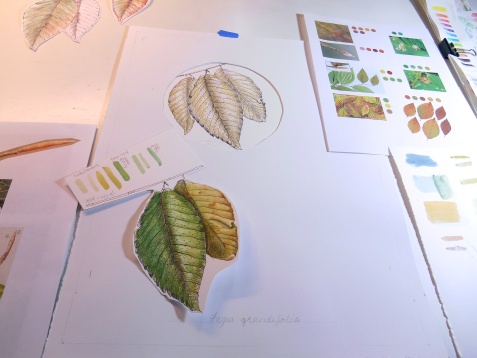
I began by inking my drawing after transferring the pencil drawing to the Fabriano Artistico paper. I used Micron pens for this. You can see on the left that before committing to the good paper, I tried out the pen line work and stippling (dots to create shadow) for the leaves on a scrap piece of the same paper and laid it over my piece to see how it would look. On the right is the finished pen work.

Next was figuring out the color for the leaves. In botanical art, whether watercolor or colored pencil, you build up layers of color. So you can see below that I started with an underpainting on the leaves, which determines the shading. Then you add the “local” color–the actual color that you see. You have to let each layer dry thoroughly, so it is a long process, requiring a lot of patience! My image references are on the right, which I used to determine the local color. Being that I didn’t start this until December, I could not use live specimens, which is my preference. You can never be sure with photographs if the color is accurate, though there are some excellent botanical references online, such as the Lady Bird Johnson Wildflower Center.

After doing a test of the local color (foreground above), I painted the leaves on the final, which of course did not come out quite the same! I also did a test of the forest scene below, in greyscale (no color). I mixed the black watercolor paint, watering it down to make different shades of grey, rather than using black ink or black watercolor. Theoretically, you can get black by mixing the three primaries (red, yellow, and blue), but paint has a warm or cool bias, so making black requires that you mix a warm and cool of each of the primaries to get (more or less) black. Being that each of the three primaries has different strengths (yellow being the lightest), you can’t simply mix equal amounts! Why go through all this? Because you get a much richer black, containing all those colors rather than a dull, lifeless black! Besides, it’s a fun challenge to try to mix black!

Having completed the leaves, next was figuring out the color for the branches and buds. On the left I am trying out different underpainting colors and the local color. It’s very helpful to take notes on how to mix the colors and how to apply them. Sometimes I think I will remember and don’t take notes, and then I regret it! Deb Kopka showed us in her class how she saves everything from a project–copious notes, drawings, sketches, everything! Before the invention of photography when artists accompanied scientists and explorers on long journeys, they made extensive color swatches with notes of botanical specimens so the colors could be duplicated once they returned home.

Finally, I painted the forest in greyscale, and then also added some grey shadows to the nuts, and branches in the back.

The finishing steps: deciding if and where to add the plant name, signing my name, and any final tweeks. I added a bit of colored pencil to heighten the color on the buds and leaves. Fini!
This was an immensely satisfying project! It drew on everything I have learned in the botanical workshops I’ve been taking combined with researching the tree and all its minute aspects. I feel like Fagus grandifolia has become my friend with whom I have intimate knowledge! I will definitely do this again, and plan to sign up for the next Flora project! Next time, however, I won’t wait until December to do it–I hope!

I am very happy to have come across this blog page today as it so happens that I selected the American Beech tree for “my tree” to study and paint for two years. I am taking an on line botanical art course. I am presently required to write a paper about my tree’s place in art history and what got me to your blog page was a Google search for “early American art American Beech.” I see those three beautiful plates. Can you tell me more about them?
Your art work is beautiful and the process you used is so clearly explained. Thank you for posting it. Please share more! I will be coming back to this page to learn from your experience, as I will be doing a final project such as your’s once “my tree” has been through all four seasons.